Shooto in 1986 (!) "The Story of Shooto Vol.1 "The Technical Shooting Fight"

Kakutogi Road Presents: Sayama’s Corner "The Story of Shooto Vol.21"


The Shooting Bible 19851480×695 90 KB


This is a continuation of where we left off last time. Again, special thanks to our resident translator, John Krummel for his immense efforts.


tigermask188570×748 49.4 KB


Previous Page Translated

The designation hook comes from the meaning of a fishing hook in English. As its name says, the form of this punch, making an acute angle from the shoulder to the tip of the hand, is hook-shaped.

The left shooting short hook (short hook) is outstanding in power because it hits the opponent at a short angle with the left hand that is the closest to him. By contrast it is more difficult to effectively hit with the right shooting long hook (long hook) because of the long orbit of its punch.

Here I will explain, along with the shooting straight, by focusing on the shooting short hook that is one of the basic punches.

2) Shooting long hook:

In order to accurately land the shooting long hook, the orbit of whose punch is long, necessitates an advanced level of technique. This book focuses on the basics so I will explain, for beginners, as a substitute the right straight and swing hook.


tigermask189669×520 66.7 KB


Training method for the shooting short hook:

At first hold the ball with you right hand under your arm and practice lightly swapping it whilt taking care not to make this into a telephone punch.

When you can do this smoothly, practice entering your hips and shoulder without using the ball.


tigermask190905×420 72.1 KB


[side bar:]

Point: “When throwing a hook punch with a step, don’t let the neck (head) to move by being pulled by the shoulder’s movement. The neck tends to move to the right when hitting the left hook or to the left when hitting the right hook. Always draw in your chin and make sure your face is facing the opponent’s front.”


tigermask191565×733 44.2 KB


Previous Page Translated

Shooting Swing Hook:

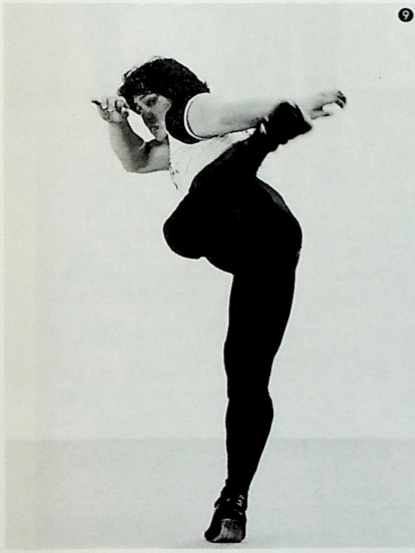
  1. Posture in the low-center-of-gravity upright style.

  2. Slide to the left with footwork. Swing the right hand that was in guard, making a big circle, to the back while scraping your flank.

  3. While moving your body in a large motion to the left, quickly hit the opponent by swinging from the diagonal back.


tigermask192828×399 63.3 KB


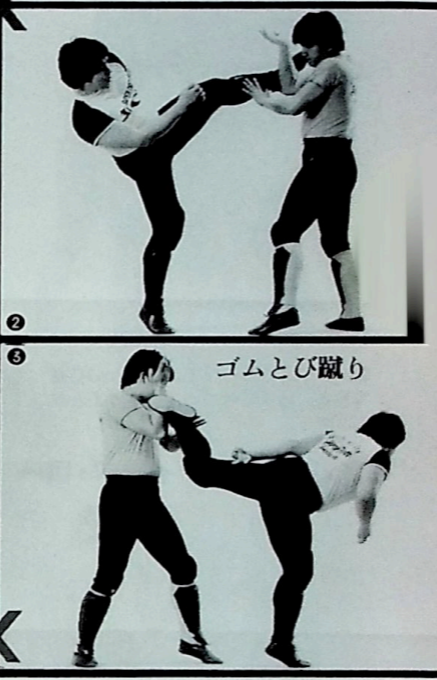
Pattern in real fights:

From a close distance slide with a big step to the left and at the same time your right hand should start the movement of the shooting swing hook. In photo 4 you can see the balance between the sliding and the right punch.

To hit the opponent with a shooting swing hook effectively in a real fight, it’s necessary to pay attention to 2 points: 1) how to enter a position where you can easily hit him; and 2) how to move in a way that cannot be predicted or anticipated by the opponent. For this, it’s effective to employ the sliding step characteristic of shooting and strike while deflecting the opponent’s counter.


tigermask193868×513 55 KB


To Be Continued…
b8562fae10540e7eff69f28eac0dc5ceb8e173f3.jpeg
 
Kakutogi Road Presents: Sayama’s Corner "The Story of Shooto Vol.22"

27a61506b361074ddd9ffdaed9c1ea98ad39f8c8.jpeg


This is a continuation of where we left off last time. Again, special thanks to our resident translator, John Krummel for his immense efforts.

e19ffed2730eb1c0e57632be034991c9f5a175b9.jpeg


Previous Page Translated

Shooting swing hook is a punch you throw by sliding your body widely to the left or the right.

The point that distinguishes it from the shooting long hook is that by incorporating the sliding technique it can change a punch in a curving line to a punch in a straight line.

In a real fight, using the feint with a sliding sweep or a tackle, get the opponent to focus on his attention to his lower body, and then hit [the swing hook] as hard as you can. Amazingly this usually works.

At first sight it would seem that this punch would be unlikely to hit its mark but by using shooting’s unique technique of sliding, it becomes one effective move.

4. In the follow-through, solidly guard yourself with the right shoulder and left hand

b13d2b5ed098dd34cb8513f8ebf913f7f63c2527.jpeg


5. The striking surface is the lower part of your palm heel.

6. Hit the opponent’s temple or chin as if you are hooking it.
ec71ef19d76d0c188ba9ecde63faca0bdca0ad3c.jpeg


7. If you throw this without sliding and from a simple side stance, it will just look like a haymaker punch to the opponent.

2f79dcd16ce638420ba943db5dfbaf5e07ea2f90.jpeg


Caution:

In shooting, gloves are not worn. Punches must be thrown with the open hand (the palm of the hand). Keep in mind that one must not strike with the fist.

When excited during a match, one inevitably forms a fist but because this is very dangerous, one must avoid this. Take care to learn the timing and balance for striking with the open hand.

[Side bar:]

Point: “If one hits from a side stance, it will simply be a swing . But by sliding the body to the side, it becomes a swing-punch . You need to firmly grasp the timing for sliding and punching.”

33f1d9be475060b833f9c1fe6f6abe9cdefc72ce.jpeg


Previous Page Translated

Shooting Uppercut:

  1. Stand in the low-center-of-gravity upright style.

  2. Step in while lowering yourself, squeeze your elbow with your arm to tightly on your side.

  3. With your weight on your left foot, strike by spring up with your left leg and turning your waist.
8c43229e16f8ac148cee6759f4865d926d66d23e.jpeg


Real fight pattern:

Enter the opponent’s inside low while closing your armpits and guarding your chin with both hands. Put weight on the left foot stepping in and throw the left shooting uppercut upwards. When striking don’t forget the guard.

In a real fight, there are times when you may have to strike with the hand (right hand in the photo) opposite to the stepping foot. In such a case, step in with the left foot and throw the right shooting uppercut by turning the right foot and waist.

721627918206a3b1872172d5d12cdac22fb4c054.jpeg


cd1c37b5adfc875ed6177e260371ccae26c7a51c.jpeg


Previous Page Translated

A punch that is particular effective against an opponent holding a high guard is the shooting uppercut.

Naturally it is a punch that has the potential for a one hit KO. But for shooting, the distance for uppercuts in boxing, is completely in a distance of close contact, so the striking method and effect are quite different.

To be able to naturally throw the shooting uppercut requires a lot of training and time. But if you learn it from the solid basics, the breadth of your striking becomes much broader.

Pay attention to the position of the feet and the body’s balance.

25c674c01ba553bfb7e47caafc34686494c2de2f.jpeg


If you hit him by throwing your uppercut upwards when the opponent drops down, it becomes a long upper. But you should not stretch your arm upwards excessively.

Noteworthy points:
5de3e539531528897023c88f8759eab688bd868b.jpeg


The pinky in both hands is placed over the ring finger, but this is to avoid fracture by being caught when blocking the opponent’s kick.

In the ready posture. When hitting.**

In striking with bare hands, the pinky can easily be fractured, so make it a habit to protect the pinky in daily practice.

29746c6d4e95329841accd858d01d4077b3f3b24.jpeg


[side bar:]

“In boxing there is also the method of throwing an uppercut turning to the left, but for the shooting uppercut, you are hitting with the palm heel, learn how to throw the strike by turning to the right. For both left and right, you strike but turning from inside to outside.”

To Be Continued…

b8562fae10540e7eff69f28eac0dc5ceb8e173f3.jpeg
 
Kakutogi Road Presents: Sayama’s Corner "The Story of Shooto Vol.23"

2ecdd39a1f59731d7b473f3db056b59e41488cf9.jpeg


*Special Thanks to our resident translator John Krummel for his invaluable assistance! *

d99cf0e2979396f66dfc767d83b88bf1802a1e48.jpeg


Previous Page Translated

Elbow Punch:

[Translator’s note: Sayama is here using the word “punch” for the elbow strike by calling it “elbow punch” even if it sounds strange in English.]

  1. Position yourself in the low-center-of-gravity upright style.

  2. Turn inwards and thrust your shoulder out while facing your palm upwards.
    24e436b2ad1bd79a53d3c30833a4b8fe16252fab.jpeg

The elbow punch is a powerful technique that can aim for the one hit KO when connecting a clean hit since it strikes by using the hardest part of the human body, the “elbow.”

Although the elbow punch can also be used to aim for a TKO win by intentionally cutting the opponent’s face or head and making him bleed, but in shooting that emphasizes safety, one is required to wear protective gear for the face and head. But I want you to thoroughly learn the basic technique correctly to make most of the elbow punch’s features.

Real fight pattern:

Aim to hit the temple while always guarding yourself with the left hand from the initial posture to the follow-through.

a436a1b2599b2522b0ff00658812d67731464f42.png


e0fdbdb110e7d893e817fab30a1c729fc4df2a31.jpeg


Previous Page Translated

  1. Swing through the inner side more than the shooting short hook.
    df68671b9575b311deaa4669f808fbea108acc15.png


  2. Don’t forget to guard yourself with the shoulder.
    704fc7263ad4e9793a50b1ddd6405494cc160f31.png

Noteworthy points:

Because striking techniques give rise to powerful impact, “pulling power” is necessary. It is not easy to completely comprehend the meaning of “pulling power.” But, first of all, begin by practicing to return to the original position immediately after punching.

Especially it is not wrong to think that the moment one misses after striking is the perfect chance for the opponent to strike back. Decide whether you can go from that position for a tackle or a kick, and if not, immediately return to the original position.

Real fight pattern II:

In a real fight, the elbow punch thrown is effective as a counter against an opponent advancing with a punching strike.

Block he opponent’s right shooting long hook with your left hand and throw a right elbow punch. If you dare to enter the inside, this is the distance for the elbow punch, and the power of the opponent’s punch would be reduced to half.

There is also the method of throwing the elbow punch from above the opponent’s punch after waiting for the opponent to punch.

[side bar:]

Point: “Make it a habit to hit from above. If you throw the elbow punch from the side, you are inviting counter punches, such as the hook or the straight. Strike while guarding yourself with the skillful use of the shoulder.”

f0143bd2576d697374a08491a0990b8c7db91d5c.jpeg


Previous Page Translated

Defense for Punch:

1) Stopping:

The method of blocking the opponent’s punch with palm of the hand.

  1. Stopping is particularly effective against the left shooting straight (jab).

  2. Move in small motions, without making any unnecessary motions at all. Do not at all close your eyes even if the opponent’s punch comes directly in front of your face.

  3. Stopping against the shooting uppercut.
    efad8d98a217f7185f356f93baab3ef24c269b8b.png

2) Parrying:

The method of parrying the opponent’s punch with the hand.

  1. Parry the opponent’s punch by shifting its axis while sliding the upper body a little to the outside.

  2. Against a left punch, parry with the right hand.
5947b3a140c1a13e94de568b2d308ce30749b742.png


  1. [p. 63(65)] Against a right punch, parry with the left hand. If you use the other hand, you need to be careful since you can easily be countered.
    e1f5c93102cab2c7e6bd7c61bf080b1160726c35.png
[side bar:]

Point: “Instead of his fingers, look at the opponent’s movement. Draw in your chin, keep your angle, and do not take your eyes off of the opponent. Always defend yourself once your upper body has been destabilized by a punch, by supposing that the opponent will attack with a leg trip or a tackle.”

c7b567dccc1652e30b312d90e3572d5ec214f48c.jpeg


Previous Page Translated

Defensive techniques are techniques that protect your own body from the opponent’s attacks. No matter how destructive your punches are, if you do not know any defense, you would be unable to utilize the force of your offense.

A shooting match with only offense, or with only defense, cannot exist. You need to understand that the saying, “Offense is the best defense,” also contains the meaning that “offense” and “defense” are two sides of the same coin.

Real fight pattern:

A bad example of directly receiving the opponent’s high kick when making unnecessary movements.

Even though weaving is defense method effective in boxing, it’s better not to use it in shooting. Never make any unnecessary movements that can invite a counter in kicks or a tackle.

c13a31a081d125da4edae659bddff1ea010458a8.png


5ebca92eb3dab5a2dd6c34f7c88888c861a5f436.jpeg


Previous Page Translated

3) Swaying:

The method of avoiding an attack by bending the upper body back without using any steps:

  1. Swaying in response to the left shooting straight. Bend the upper body backwards by shifting the weight to the right foot while guarding yourself with the left shoulder and right hand.

  2. Swaying in response to the left shooting uppercut. It’s dangerous to remain bent backwards so immediately return to a position where you can attack him.
4d6c113e6e24bd780a4673ad39c10ddcca45e3af.png


4) [translator’s note: it says 5 but I think that’s a typo] Single cover blocking:

The method of blocking from the front with one arm and shoulder:

  1. Single cover blocking in response to the right shooting straight. Keep looking at the opponent through the space made by your arm.
    c4d9cf1a90ee59cdebeade1b75219843dd600393.png


  2. View of 1. from above.
    68d875ddebd8105ed0d386e36d6275ef1e810399.png


  3. Guard your chin with your shoulder and your temple with your hand. The single cover block is effective against all kinds of punches.
    9e68d19789b4a51e405af5f43ca4d8f21939ee26.png

[side bar:]

Point: “Defend yourself rhythmically. In a real fight, to respond after the opponent’s punch, is too late. Grasp the rhythm by training in repetition until your body can react naturally to the opponent’s moves.”

To Be Continued
b8562fae10540e7eff69f28eac0dc5ceb8e173f3.jpeg
 
Kakutogi Road Presents: Sayama’s Corner "The Story of Shooto Vol.24"

6yeogzbwil151610×713 46.2 KB


*Special Thanks to our resident translator John Krummel for his invaluable assistance! *

tigermask222554×685 435 KB


Previous Page Translated

5) [translator’s note: it says 4 but probably a typo] Blocking:

The method of defending with the hand, arm, and elbow against the opponent’s punch:

Keep your elbow tight to your side. Protect your temple with the hand and your chin with the arm. This is an especially effective defense against the shooting short hook

tigermask223393×505 206 KB


6) Double Cover Blocking:

The method of defending with both hands against the opponent’s punch:

  1. The double cover blocking is effective when advancing directly to the front or when driven backwards. Pull in your chin, close your elbows tightly, and protect your temples and chin with both hands. If you position yourself a little lower you can also protect your body with this. Face your forehead to the opponent and never look down.
911107330b64bad15821acf9a7db6cc4f1b87588.png


tigermask225587×712 43.5 KB


Previous Page Translated

7) Body Stopping:

The technique of erasing the power of the opponent’s punch by pushing the axis of his upper body when he throws his punch:

  1. Keeping your center of gravity low, guard your chin with the left hand. Draw in your chin and, maintaining a certain angle, prevent the opponent’s punch from directly hitting you.

  2. Don’t just extend your arm directly but push it out like you’re stabbing him.

tigermask226792×328 307 KB


  1. [p. 67 (69)] Push the core of the upper body such as the chest, neck, or chin.

  2. Bad example where you are fleeing the opponent. Push without fearing the punch.

tigermask227910×424 31.7 KB


[back to p. 66 (p. 68)]

Real fight pattern:

Plunge in with body stopping. The opponent is throwing the shooting straight but the core of his body is being pushed (by the left arm) so his punch is not effective.

tigermask228730×530 404 KB


[Side bar:]

Point: “The skill of sliding is indispensable in techniques of leaping into the opponent’s inside, such as the shooting swing hook or leg trip. It is effective if you practice sliding continuous with the other techniques.”

tigermask229555×669 43.7 KB


8) Sliding:

The method of plunging into the opponent while evading his punch with the sideways footwork

  1. From the low-center-of-gravity upright style, lower the guard so you can easily sway your shoulders and neck.

  2. Evade the opponent’s right shooting straight by sliding a large step into the left frontward direction, plunging forward with forehead first.

  3. Switch to a leg sweep while evading the punch.

  4. If you hook the opponent’s left foot that now has his weight, you can sweep him down or force him into grappling.

tigermask230582×619 397 KB


9) Stepping:

Stepping is to forcefully step forward when sliding.

With minute and quick sideways footwork, step forward in two steps by turning as if thrusting forth at once your stored up energy.

For the timing of stepping, endeavor to suddenly enter unpredictably. This is to avoid being countered by the opponent’s strike when entering.

From the opponent’s perspective, your ideal would be to suddenly be on his inside before he knows it.

tigermask231635×779 62.6 KB


Exercise 2:

Theory on Counters:

In order to transition from striking to grappling, one must enter into the inside of the opponent. Understanding the “theory of counters” in shooting is necessary for not only entering into the inside of the opponent but also for controlling a fight to move it in a direction advantageous to yourself.

The theory of counters in shooting’s striking techniques clarifies the relationship between “distance” and “point.”

For example, in a real fight, if one is in a distance (point) where the shooting short hook will hit the mark, at that moment, when the opponent throws the shooting short hook, one will either be completely knocked out or receive damage close to a knock out.

On the other hand, if one is positioned inside or outside of that point where the shooting short hook can hit one, even if the opponent throws the shooting short hook with full force, it will not be effective enough to cause a knock out.

Either by stepping into the inside of the opponent’s point of striking or staying outside of it, one is in the safety zone in relation to the opponent’s striking. That is, there is no reason to fear the strikes if one solidly guards one’s vital areas at least when passing through that point.

Among model methods of distancing that can avoid striking, there are two— riai and muai [Translator’s note: These are his neologisms, there are no exact translations of them].

In the distance of riai [‘separation’], strikes will not hit your, and in the state of muai [‘no separation’], where your chest is in contact with the opponent, it is almost impossible to throw or receive any striking techniques.

Shooting matches transition from striking to grappling. This means that one huge element that would decide the outcome of the match is how to enter while avoiding the opponent’s counters and shift to grappling.

This is why the skills of sliding or feinting are needed. There are also high level techniques of intentionally putting oneself in a position so as to invite a counter in order to deflect the opponent’s counter and when the opponent throws the counter, immediately dodging it and in turn positioning the opponent in one’s own countering point.

What you need to be careful about in this situation is to firmly guard your vital areas. No matter how well you can slide or feint, if you get hit in a vital area, there is no point to it.

But if it’s somewhere other than a vital area, even if you get hit by a punch or a kick, you would only feel that “he hit me” but not feel any damage from it.

In this way, the essence of the theory of counters in shooting is the point of perfectly matching striking and distancing and how to protect one’s weak points.

As Gotch used to say, a “real fight involves mutual deception.”

To Be Continued…
b8562fae10540e7eff69f28eac0dc5ceb8e173f3.jpeg
 
Kakutogi Road Presents: Sayama’s Corner "The Story of Shooto Vol.25"
37243a7a287f72ece9ff3094f67cf49f275c51ad.png


*Special Thanks to our resident translator John Krummel for his invaluable assistance! *

0ae88616f3d80220f36c18e359687e102f9e5e35.jpeg


Previous Page Translated

The hang of training:

1. Don’t look at the punch:

It’s too late to react after seeing the punch. Look at a single point between the opponent’s eyes and chest (depending on the individual) and learn to read the timing of whether he will throw a punch or not.

2. **Learn the timing of simultaneity: **

With the accumulation of real sparring practice, learn the timing of the opponent’s punch. On that basis learn to throw your own punch simultaneous to the opponent’s punch.
c9db3a684447e775e725e2ab761ed3f7185092a0.png


[Photo captions:]

  1. Let your partner throw a left shooting straight (jab) and measure its timing.

  2. Stop it with your right hand and at the same time throw your own left shooting straight (jab).

  3. Position yourself in the distance (intermediate distance) for striking

  4. Let your partner throw a left shooting straight (jab) and at the same time deflect it by sliding to the right.

  5. Quickly shift to a body tackle.
6. Accurately measure the punching distance:

On the basis of the theory of counters, shift the point of the opponent’s punch and go for a tackle.

7. Make it a habit to go forward:

Have your partner throw all sorts of punches, changing with different timing, and repeat this practice until you can step forward without the fear of punches.
b6e30401b2807ba03ab773dee8256f1e85aafde0.png

717d9d0f2af85703347cb29aad0edec078e31633.jpeg


Previous Page Translated

The Position of Vital Points:

Whether in striking or in submissions, it would be a waste of energy to attack just randomly.

When attacking, it would be meaningless unless one must attacks a vital point, and if one doesn’t hit the vital point, one would be attacked in reverse and one’s strike would not be effective. In defense, unless one deflects the attack from one’s vital point, it could lead to a give-up or KO. It is indispensable to learn to know the correct positions of the vital points.

For striking techniques:

1.Temple

2.Front of the face

5.Chin

9.Solar plexus

10.Liver

16.Front thigh

17.Inner thigh

18.Outer thigh

For submission techniques:

1.Temple

2.Front of the face

3.Upper molar

4.Lower molar

6.Carotid artery

7.Adam’s apple

8.Shoulder area

11.Elbow area

13.Back

14.Waist area

15.Hip joint

19.Knee area

20.Ankle area

21.Achilles tendon

22.Inner lower part of shin

88776b84d44b7f914a92b097f5f37591f5b1867e.jpeg


Previous Page Translated

Real Fight Course on Techniques:

“Striking”: Kicks:

Kicking techniques can be divided into impact kicks (middle kick, high kick, low kick) and pushing kicks (leg trips = sweeps).

Impact kicks are for the purpose of damaging the opponent. Although kicks have immense destructive power that can produce a one hit KO, in shooting matches often end with a joint lock submission. Hence in real fights, pushing kicks that take an opponent down are also important.

f969e221f0db5eadfd33e9b40815bb3de6787e32.png


Previous Page Translated

Mechanism of Kick:

1) Switch:

  1. Position yourself in the low-center-of-gravity upright style (see photo 1). The moment of switching your legs (left and right) without moving your upper body.

  2. Almost simultaneous to withdrawing your left foot, being stepping forward with your right foot (see photo 2). When doing so, don’t put your left heel on the mat.

  3. Step forward with the springing of your left toes. With the left foot stepping forward, step forward with the right foot (see photo 3).
    60749d9e4320315b37259331b2faaecbbada95f7.png

2) Turn:

  1. The point below the knees and outside, facing the opponent.

  2. Kick as if pulling from above the knees.

  3. When the foot has stretched out after turning.

  4. When the foot returns with the pulling force.

  5. Instead of intentionally trying to return the foot, after the impact the foot should natural return because you are kicking with the force of pulling.
    7fc36ba23810641876c34f2644fb7296ee4ac6d2.png

To Be Continued…
b8562fae10540e7eff69f28eac0dc5ceb8e173f3.jpeg
 
Kakutogi Road Presents: Sayama’s Corner "The Story of Shooto Vol.26"


001354×512 56.6 KB


*Special Thanks to our resident translator John Krummel for his invaluable assistance! *


tigermask240552×738 39.1 KB


Previous Page Translated

The corkscrew kick that is unique to shooting differs from the image of the traditional roundhouse kick (hitting horizontally) and is a powerful kick that strikes from the least distance.

To kick from the least distance means that it is necessary to hit the opponent “more quickly” and “with greater power.”

To kick “more quickly” and “with greater power” is also the basis of kicking.

Let me first explain the technique of the “switch” and the “turn” that is the basic “mechanism of kicking.”

The foot movements in the switch
2223162008b56b52bc41c2302b7e894b568551ea.png


Why is the switch necessary?:

If one throws a right kick when both fighters are posturing in the low-center-of-gravity upright style with the left foot forward, it will hit the opponent’s center back but we cannot call it an effective kick. But if one throws a left kick, one can severely damage the opponent by hitting him from the front.

The switch is the run-up for [approach to] throwing an effective left kick when standing with the right foot as the pivot foot. Therefore do not forget that, from the very point in time of the switch, this is a kick.

[Sidebar:]

Point: “Kicks that ordinary people throw when they kick as hard as they can, for shooting are simply pushes. By the effect of the turning of the waist and points in the knees, we transform kicks that otherwise would be nothing but pushes into something high in ballistic power.”


tigermask242559×752 39.7 KB


Previous Page Translated

Knee Kick:

  1. Position yourself in the low-center-of gravity upright style. Notice how the upperbody line in photos 1~4 are uniform.

  2. Switch [your feet] and with the left foot’s step, the entire body advances forward


tigermask2431135×477 30.1 KB


  1. [Next Page] Position in which with the switch the knee naturally comes forward. Kick with the thought that your leg begins from the pit of the stomach while fixing the direction of your head.

  2. Thrust your knee forward with the power of your waist [hips] and by tightening your crotch. Thrust your knee in a diagonal direction towards the opponent.


    tigermask244913×479 27.9 KB


Real fight pattern I:

Pierce the opponent with the knee kick while controlling the opponent by placing your left hand on the area from the opponent’s neck to the back of his head (photo 2).

In the side knee kick often used in real fights, unbalance the opponent down to the side and kick from the side like a roundhouse kick.


tigermask245783×640 46.9 KB


Noteworthy points:

The knee is one of the hardest parts of the human body so you can produce sufficient damage just by hitting the opponent with it. However, the aim here is to acquire an even more effective knee kick by training yourself to hit with the entire body.

Often when trying to hit with the knee the hips [or waist] sink down. Instead it is better to thrust the hip [waist] forward and kick by thinking of the area from the pit of the stomach to the knee as a single pole.


tigermask246555×725 45.1 KB


Previous Page Translated

The knee kick displays its power in close combat transitioning from striking to grappling. While the knee kick is its own independent technique, it also constitutes the turning axis of the waist that becomes the starting movement of the corkscrew kick.

With knee kicks, the faster the speed, the stronger the kick. In short, it is the basis for acquiring the techniques of the middle kick, high kick, and low kick.

Real fight pattern II:

The moment of transition from striking to grappling becomes the ideal chance for landing a knee kick.

Hold the opponent’s back of the head or neck and drag him down forward to kick his face. When doing this, the drag and the knee kick must be simultaneous (photo 1).

And since it would be disadvantageous to be placed in a state of muai [no separation] by being clinched by the opponent, there is also the technique of kicking him while destabilizing his upper body by widely shaking him left and right (photo 2).


tigermask247535×642 431 KB


[Side bar:]

Point: “In the Knee kick in shooting, one thrusts the hips [waist] forward to kick rather than bending the body to kick. The body bends because one thrusts the whole body forward with the hips [waist] while drawing in the chin and without moving the head.”

To Be Continued…

b8562fae10540e7eff69f28eac0dc5ceb8e173f3.jpeg
 
Kakutogi Road Presents: Sayama’s Corner "The Story of Shooto Vol.27"

7a3b2a966064fefaf43d42af620d01cc9c45ed1d.jpeg


*Special Thanks to our resident translator John Krummel for his invaluable assistance! *


tigermask248568×739 47.8 KB


Previous Page Translated

Middle Kick:

  1. Stand in the lower-center-of-gravity upright style.

  2. Switch [feet] and step forward with the right foot. The weight of the upper body should be placed on the right side.

  3. While keeping your head stable, tighten/bend you knee and swing your left foot upwards while standing on your toes.

  4. Fixing your aim on the opponent’s left side, thrust your leg to hit with the outside part below your knee [shin?]. Rather than trying to swing with the leg, swing with theturn of the waist (make this sharp).

240×707 207 KB


  1. While turning the left foot from the outside to the inside and pulling-in from above the knee, kick as if to rend.

  2. The foot will naturally return by its pulling power.

  3. Swiftly return to your original position so that you can transition to the next attack.

tigermask250292×677 237 KB


[Sidebar:]

Point: “The basics of the middle kick is: 1) Correctly stabilize your head; 2) The upper body moves to the right side; 3) The weight should go a little forward; 4) Don’t bend your upper body to the back; 5) Relax like you are hoola-dancing, and kick with a crisp turn (with sharpness) of the hips/waist.”


tigermask251552×723 43.4 KB


Previous Page Translated

The middle kick is the basis of all impact style kicks. “Pierce, turn, and pull! Kick with your returning force!” I want you to be diligent in your training until you come to understand these words with your body.

The middle kick, at times can serve as a body blow, and is also effective as a move to keep the opponent from entering into one’s inside.

  1. This is the point below the knee on the outside (where the finger is pointing in the photo). With this point, pierce the opponent’s left flank on the outside and kick while turning and pulling. This is an important point that is common in all aspects with the corkscrew kick.
bca4440bae04bd6ae68de380e65acc7df73ca7c2.png


  1. Where the foot has turned in a corkscrew (spiraling) with the knee as center. The sharper the turn of the waist/hips, the heel faces upwards when swung up. Even in this state the head remains where it was.


tigermask253415×553 222 KB


  1. Bad example: The kick here is with the inner part of the shin. And fearing being punched, the head is drawn back.
85f9583e9a50a29a98af5828e1364416d1cb205f.png


  1. Bad example: The left foot has entered too far, preventing any turning. And moreover the face is looking away.
    b62473ff176d132f6bb04a39bf7cdbebc544aee5.png
Points to note:

Look at the head position in the photos. You should note that the angle of the occipital region of the head is almost the same (see photos 1~7).

When kicking, draw the chin in and stabilize the angle of your head. But when doing this don’t make yourself stiff by using too much strength.

In finishing your kick be careful to not arching your upper body backwards. The point is to keep your head where it was.


tigermask256578×710 46.9 KB


High Kick:

*What can be said in common about the middle, high, and low kicks is that one kicks while putting the axis on the base of the big toe and the middle toe of the pivoting foot and, at the moment of impact, focusing the power with the intent of standing on the toes.

  1. From the low-center-of-gravity upright style posture, begin the motion of switching [feet].

  2. Keep your gaze steady (unless you are feinting). If you thoughtlessly raise your gaze, the opponent will know you are about to throw a high kick.

  3. The state of swinging your foot up. Bring the outside point below the knee to the center of the opponent’s body.

269×704 224 KB


  1. Don’t kick the high kick in an encroaching manner but kick to produce a stronger impact. For that you need to kick with a “bang!” by turning and pulling more quickly.

  2. Like the middle kick, the foot naturally returns by the pulling power from above the knee.

  3. It is difficult to find your balance after kicking. Keeping your head steady is the key.

  4. Never forget the guard.

tigermask259297×535 213 KB


[Side bar:]

Point: “The basics is the same as the middle kick, but with the high kick, the emphasis should be on the impact as the knee enters shallowly. Don’t kick in an encroaching manner, but bring the outside point below the knee into the opponent’s center.”


tigermask260618×783 60.5 KB


Previous Page Translated

Since it involves a corkscrew kick that directly hits the heat, the high kick if it hits its target perfectly, can result in a KO.

The difference with the middle kick is whether the knee’s entering is deep or shallow. So the movement up to the mid-point is the same between the knee kick, middle kick, and high kick.

As a strategy, you can easily hit the mark if you pretend to aim for the leg or the body and then kick the head. The middle and high kicks that intentionally hit the opponent from above the guard is also effective.

Bad examples:

  1. Here the hips/waist have not been turned inward. He is kicking only with the toes.
c19bb47b2b297f5dbf50fff870b39fbfb36413f4.png


  1. Here the head is fleeing and there is not weight placed onto the kick.

  2. Here the foot is too deeply inward but without any turning motion.


tigermask262437×680 316 KB


The high kick turn:

Unlike the middle kick, the knee does not enter deeply. Adjust the outside point of your leg below the knee to the center of the opponent’s body and then turn the knee immediately before impact. In photo 1 the leg is plunging into the opponent and then in photo 2 the leg is extended by turning. Photo 3 is after impact the leg is extended.

The extended kick unique to the high kick is not something you can throw just by thinking of it. The extended kick can happen only by including in it sharpness in the turning of the hips/waist and leg and pulling power.


tigermask2631072×530 62.6 KB


To Be Continued…
b8562fae10540e7eff69f28eac0dc5ceb8e173f3.jpeg
 
Have you ever thought about publishing a book on these topics friend?
 
I am in the preparatory stages of compiling a book of our Kakutogi misadventures. Of course, we plan on having a considerable amount of new content as well. I'm not sure when the timeline would be on a release date, however.
Cool. Please let us know when it may be ready for pre-order.
 
Kakutogi Road Presents: Sayama’s Corner "The Story of Shooto Vol.28"

71280×720 53.5 KB

*Special Thanks to our resident translator John Krummel for his invaluable assistance! *


tigermask264577×743 48.8 KB

Previous Page Translated

1. Right sliding low kick:

  1. Feint a punch to measure the distance from the opponent. This can be done by just touching the opponent.
2. Widely bring the right hand forward as if you are going to throw a punch and slide to the left and swing the right foot up.

3. Bend the upper body down to the left front


tigermask2651014×320 350 KB


2. Left sliding low kick:


  1. Position yourself in the lower-center-of-gravity upright stance.

  2. Switch your legs and lower your center of gravity.

  3. Put forward your left hand to the opponent’s left side and being the kick while feinting.

tigermask2661015×322 341 KB


[pictures taken from following page]

  1. Like in other corkscrew kicks, turn and pull.

  2. Kick the vital spot of the opponent’s left leg (where the finger is pointing).

tigermask267763×398 328 KB

  1. Kick the corkscrew kick from a low posture.

  2. The vital spot of the opponent’s right leg (where the finger is pointing).

tigermask268725×385 323 KB


Real fight pattern:

The low kick is also effective as a counter to punches. When the opponent attacks with a left shooting straight [punch], throw a left low kick to the left leg by sliding to the right (photo 1). [p. 80] To the right shooting straight [punch], slide to the left and throw a right low kick to the opponent’s left leg (photo 2).


tigermask269737×265 226 KB


tigermask270629×758 56.5 KB


Previous Page Translated


Warning:

Switching [feet] is a technique necessary to throw the corkscrew kick, but if you also master the skill of sliding, you can just slide the upper body without switching.

Keep fully in mind that “combat is alive” and try to avoid as much as you can a single-patterned strategy.

[Sidebar:]

“Make sure your shin accurately hits the opponent’s vital spot. As distinct from the leg trip (sweep) that is for throwing the opponent down, the low kick is for the purpose of providing damage to the opponent’s leg.”


tigermask271578×744 43.4 KB


Rolling Sobat [ Translator’s note: Japanese misspelling, it should be: Savate . The Japanese have always called this spinning back kick when used in prowrestling, “rolling savate,” probably because it originated in the French martial art savate. They also call the simple back kick when used in prowrestling “savate” too. ]

  1. From the low-center-of-gravity upright style stance, lower your guard a little.

  2. Point your left heel to the opponent and bend and lower your left arm/hand to the inner side. Bend and raise your right hand to the inner side. With this movement turn your shoulders ¼ degree while keeping your neck where it was.

  3. Turn your head forcefully to the right and kick with your right foot as if thrusting through while your body faces the back.

tigermask272940×455 33.3 KB


  1. [Picture presented on following page]: Kick the liver with the heel.

  2. The upper body extends from the buttocks to the right side.

tigermask273774×525 36.2 KB


tigermask274549×727 50 KB


Previous Page Translated


The rolling savate is a major move that can lead to a KO. However, it is also a dangerous technique that, if deflected, can fall prey to a tackle [take-down].

The rolling savate and the spin kick, distinct from the corkscrew kick, lack any “pull” and hence must be performed only after fulling considering the techniques after the kick.

But it’s no mistake that one’s strategy would be greatly broadened if one masters a powerful rolling savate that penetrates a momentary gap in the opponent,.

Sparring [real fight] pattern :

The speed of its initial movement determines the power of the rolling savate.

While leading with the left hand (photo 2), rotate the body (photo 3), and kick as if you’re thrusting your buttocks to the opponent’s left side (photos 4, 5).

Warning:

Even among the techniques you have been practicing everyday, it is very difficult to execute them with good timing in the midst of the flow of a heated match.

Especially a big move like the rolling savate is not so effective if you use it a lot. It becomes an effective technique only when throwing it with unexpected timing.

Sidebar:

“How fast after posturing can you make a quarter turn of your shoulder, directing your heel to the opponent. In order to increase the speed of your initial velocity, you must turn in a compact manner. The key, before kicking, is to turn while placing the knee to the chest.”


tigermask275567×714 35.3 KB


Spin Kick:

  1. Stand in the lower-center-of-gravity upright style.

  2. In the same way as in the rolling savate, start the initial motion. Quickly direct the heel to the opponent and make a quarter turn with the shoulders.

  3. In order to kick high, bend the knee by placing it to the head as if everything below the pit of the stomach would by your leg.

tigermask2761022×477 28.1 KB


  1. Immediately enter into the kicking position.

  2. The speed of the turn is dulled when the kick’s trace draws a wide arc. Try instead to make a compact and sharp turn.

  3. Do not break your balance even after kicking.

tigermask2771018×465 27.7 KB


tigermask278548×728 54.2 KB


Previous Page Translated


The spin kick, out of all the kicks, is the flashiest move.

It is often used to intimidate or as a sacrificial move.

It is good to use it sparingly and with distance in mind, but if you force it when under pressure, it will not hit its mark.

Like the rolling savate, when throwing the spin kick, don’t forget to “swing it through in a compact manner.”

Sparring [real fight] pattern:

A big move like the spin kick will often not hit its mark. In practice, always assume such a situation. But there is also the tactic of intentionally missing the mark as a sacrifice move.

Photos 1~5 show throwing a spin kick, missing its target, and then shifting into a leg scissors and, from there, to a knee bar.

Application of the spin kick:

We have described the method of spin-kicking that starts from the fighting stance, but there is also the method of throwing it from a feint.

For example, there is the tractic of lightly hitting the opponent by throwing a right low kick and then following this with another right low kick but this time intentionally missing the target. Then with that impetus, adding rotational force with the right foot as the axis, to throw a left spin kick.

Although this book will not cover the various applications using feints, if you practice the basic techniques, you can think of various feints and tactics on your own. To think up your own applications is also part of training.

[Side bar:]

Point: “The impact is to enter with the foot’s instep [bottom of foot?] and then hook with the heel. For the right spin kick, even if you kick with the instep, since it will hit the face, it will be effective. But for the left spin kick, there is no power unless you hook with the heel.”


tigermask279568×720 48.5 KB


Previous Page Translated

Leg Trip:

  1. From the lower-center-of-gravity upright style.

  2. So you don’t miss, enter by sliding to the front.

tigermask280769×428 348 KB


  1. [Picture presented on following page] Kick by deeply sinking and turning the body.

  2. Even after kicking, keep facing the front without breaking your balance.
In order to knock over a standing person:

The only way to knock over a man standing on two legs is to sweep his leg/s or to make him lose his balance. To break his balance, you must move to left and right.

If you break his balance with a feint or with footwork and sweep his leg/s, you can easily knock him over.


tigermask281964×407 426 KB


Previous Page Translated

)] Sparring [real fight] pattern:

When one tries to throw a right middle kick or right low kick, the opponent naturally raises his left leg to guard it.

For the leg trip in such cases, [p. 86 (88)] there is the method of cutting/reaping the opponent’s right foot (pivoting foot) and the method, as in photos 1~3, of kicking to the back of the knee with your right foot in which you kick as if pushing through his left toes he raised as a guard.

[Side bar:]

Point: “The leg trip does not necessitate the sort of impact made by the low kick. Since it is a technique simply to knock the opponent down, rather than kicking by turning and pulling, it is more effective to kick by hooking, pushing, or cutting/reaping.”

[p. 87 (89)]

The purpose of the leg trip (sweep) is not to hurt the opponent but rather it is a kick that aims to knock him over (make him fall).

It is a technique unique to shooting and because it leads to grappling (joint locks) after knocking the opponent over, we need to have in mind the next move. How to kick while breaking his balance by hooking, pushing, or reaping his knee, ankle, or shin?—The variations are far and wide.

Warning:

The leg trip can be used by the round kick. If one advances to the front while sliding, one can avoid missing the mark to a certain extent. But if one misses, instead of unnaturally trying to regain your balance, it’s better to continue turning 360 degrees to one’s original position.

Variations of the leg trip:

  1. Kick to the back of the knee. Round kick with the right foot to the back of the joint of the opponent’s left knee.

  2. Hook your right foot to the opponent’s left ankle and kick it to the front in a big circle.

  3. If the opponent guards your right leg trip by raising his left foot/leg, quickly reap/cut his right ankle (pivoting foot).

tigermask281964×407 426 KB


To Be Continued…
 
Kakutogi Road Presents: Sayama’s Corner “The Story of Shooto Vol.29”

13640×779 77.7 KB


*Special Thanks to our resident translator John Krummel for his invaluable assistance! *


tigermask284643×784 52.8 KB


tigermask284a600×779 54.3 KB


Previous Pages Translated

[I realized that since the sentences cross back and forth between this and the following page, it’s better to translate the facing pages simultaneously]

Stopping:

When with enthusiasm, one is about to advance an attack, thinking “here I come!,” there is nothing more frustrating than being stopped.

Stopping not only obstructs the opponent’s strikes, but is the optimum technique for maintaining one’s distance or for avoiding grappling (tackles [take-downs] and so on).

If used too often, it can be anticipated by the opponent and your leg grabbed, but if you throw it with timing in mind, it can be widely used and its effect is outstanding.

  1. One trick in stopping is to throw the kick down from above. For this raise your knee high.

  2. With the ball of your foot, push away at his lower abdomen.


    tigermask285922×433 426 KB


tigermask2861140×430 29.1 KB


  1. Viewing the stop-kick to the knee from above. The leg stretches forward straight.
    85bd88d0c721425651d897ca5dc6493e61d9dfa5.png
[side bar:]

Point: “Never be stiff when kicking. To check his advance and invite haste, it is sufficient to just lightly push him. It is more important to accurately kick rather than kick with power.”

Sparring [real fight] pattern:

The moment the opponent turns his back to throw a spin kick or rolling savate [kick] is also an excellent chance for you to throw a stopping kick.

You can break his balance by simply pushing his ass.

Don’t forget to push from above downward, and also don’t forget the guard in case you miss.


tigermask288752×659 46.1 KB


Warning/Caution:

Because the target is small when stopping against the knee, be careful not to miss.

If you fail, not only will you directly receive the opponent’s punches, he will enter into your (photo 2).

If he deflects your stopping kick that you threw in a stiff manner, he will counter you. So kick with only the foot.


tigermask289890×427 42.2 KB


tigermask290570×745 47.9 KB


tigermask290a547×715 50.9 KB


Previous Pages Translated

Defense for Kick [Proper English would be: Defense against kicks]

If an effective impact-giving kick (middle kick or high kick) directly hits its target, victory will be immediately decided.

A characteristic of striking techniques is that they hide within themselves a destructive power that can easily reverse the flow of a match with only one blow. But if you master a perfect guard against striking techniques, you do not have to fear them. Train your eyes to not fear strikes. “Rather than evading, guard!”

[Side bar:] Point: “Draw in your chin, tighten your elbows [bring them in], don’t try to block with only the arms, and absorb the impact with your entire body. When guarding against a right kick with both hands, the left arm should be the secondary block and the right hand from the palm to the wrist should be the main guard.”

1) The guard against middle kicks and high kicks:

1&2. The basic form for guarding against the left and right middle kicks and the left and right high kicks. Draw in your chin and keep your gaze on the opponent. The center of gravity of the upper body shifts in the direction of the respective arrows.
ba9eb18720dc2f4821c4e2a3ccf86043dbd735bd.png


3.Block the right kick with this part of the left arm (where the finger is pointing in the photo).
f111cff984aad2df34a706e8fb55568666539194.png


4.Between shin and arm, the shin is stronger. If you directly receive a kick on this part [of the arm], you can receive fracture.

5.If you try to guard with only your hand, opening your armpit in this posture, you would not be able to disperse the impact and instead will feel the full force of the impact.


tigermask293515×515 277 KB


2) The guard against low kicks

  1. The basic form for guarding against the right low kick. Keep your upper body stable and block the kick with a 90 degree angle.

  2. The basic form for guarding against the left low kick. The arrows in photos 1 & 2 are the movement of the leg.


    tigermask294667×547 411 KB


Sparring [real fight] pattern I:

Both hands are solidly guarding against the right middle kick (photo 1). But often the tactic of feinting a high kick to throw a low kick is used, so it’s also effective to guard with the left leg (photo 2).

Guarding against the right high kick with both arms and the left leg (photo 3). Look at the opponent, don’t look at the kicking foot. In this case, there is also the tactic to feint a high kick and then sweep the leg with a leg trip, so be sufficiently careful of this.


203×740 184 KB


Sparring [real fight] pattern II:

In guarding against the left and right low kicks, always block in a 90 degree angle against the kick. If you mistake the angle, you will easily feel the full force of the impact.


tigermask296709×609 41.8 KB


Warning/caution:

When guarding, don’t turn the face to the side or backwards from fearing the punches or kicks.

The point of the guard is not to avoid getting hit by the opponent’s punches or kicks, but to prevent the hit from being effective even when you are hit.
 
Volume 29 Continued...


tigermask297573×743 39 KB


tigermask298543×745 54.1 KB


Previous Pages Translated

Defense for Kick [proper English: Defense against Kicks]

1) The guard against knee kicks:

  1. Guard by crossing your arms.

  2. As he withdraws his knee kicking leg, put your arm around his waist.


    tigermask299994×512 33.7 KB


  3. Force your knee in between his legs while pulling his waist to bring him close to you.


    tigermask300447×513 261 KB


4) The guard against leg trips:

  1. Guard with the shin (area the finger is pointing in the photo).

  2. The guard against a left leg trip. Step into the right side with your left foot and shift the weight to your left foot.

  3. The guard against a right leg trip. Step into the left side with your left foot and block the kick in a right angle.


tigermask301830×579 33.6 KB


Guarding with both arms:

If you end in a situation where you are about to be knee kicked with your neck being controlled by the opponent, guard your chin and body with both arms. And if you push with your arms, the opponent will lose his distance and would only be able to aim for your body. To make an even more solid guard, cross your arms. This can also help you to easily transition to a single leg dive.

[side bar:]

Point: “The basics is to guard with the left leg against both the left and the right leg trip. Block the kick in a right angle by putting your weight on the left leg so your leg does not get clipped. You must be able to freely move your left leg when posturing in the low-center-of-gravity upright style.”

Sparring [real fight] pattern:

Do not flee the opponent’s knee kick. If you try to flee, the guard becomes sloppy and your posture can be broken. Instead if you bring him into a state of no-distance or of grappling by solidly blocking the kick with both arms, the opponent will be unable to knee kick. A frequent strategy is to enter into the opponent’s bosom by guarding the knee kick and transitioning to a single leg dive.

To make the opponent fall, take the opponent’s leg that you grabbed and scissor it between your crotch and push back as if you are making a bow.


tigermask302742×745 58.9 KB


To Be Continued…
b8562fae10540e7eff69f28eac0dc5ceb8e173f3.jpeg
 
Kakutogi Road Presents: Sayama’s Corner “The Story of Shooto Vol.30”

fbfc14c4e8581bd56076668ef193f3c25c2424a4.jpeg


*Special Thanks to our resident translator John Krummel for his invaluable assistance! *

1bafbdfe9188ac0e5b2652bc3e7473a536d4638f.jpeg

080aab49beefe90b6c306721de79ae8ea3f7b63f.jpeg


Previous Pages Translated

Defense for Kick [Defense Against Kicks]:

[Side bar:] Point: “Be sure you know how to use properly sliding and swaying in accordance with the distance. Use sliding during a striking exchange in intermediate distance, and use swaying during a striking exchange in long-range distance. And the distance is something you create on your own.”

5) Defense by sliding:

  1. The position of your left hand is the impact point of the opponent’s kick.

  2. By sliding to the left, you can escape the impact point.
85b51127e339d6f4cd4752c1b775348792da4c79.png


6) Defense by swaying:

  1. Dodge the opponent’s round kick by swaying.

  2. As soon as swaying, immediately use your recoil to transition to a striking attack.

  3. If you enter his back, bring him to the grappling range by a leg grip or tackle [take-down].

  4. You can also avoid the opponent’s spin kick by swaying.
    8bcf808b5dac54f25577d604771b30b2b88cfcc7.jpeg

Sparring pattern I:

In order to avoid being hit by the opponent’s kick, evade the impact point not frontwards and backwards but left and right.

Slide to the left of the impact point of the opponent’s left middle kick and grab his leg (photo 2).
f3e894ef574c6c4f88c2f1c5f61610e1967dc962.png


Sparring pattern II:

Avoid the impact point of the opponent’s left high kick by sliding to the left and at the same time throw a right leg trip.

a3703c6be63e44875c6dea4caf69d63949b12645.png


bd3b5a9c14189d28bc51610848beed29d9473ec6.jpeg


Previous Page Translated

Exercise – 3:

Theory of the Corkscrew Kick:

Speaking of kicks, it would be a grave mistake to simply kick the opponent randomly. There are two kinds of kicks corresponding to two different aims. As most of you can imagine, kicks that give the damage of a one shot KO, are called impact-giving kicks. The other kind is the pushing-kick that aims to check the opponent from advancing or down the opponent by sweeping his leg. In a real fight [sparring], the ontological value of a leg trip that is a pushing kick is also extremely high, but here I will elucidate by shining the spotlight on the “corkscrew kick” that is the foundation for impact-givin kicks.

There are two broad divisions of kicks:

Did you know that there are two kinds of kicks, the impact-giving kick and the pushing-kick?

The impact-giving kick aiming at a one shot KO includes the high kick, middle kick, low kick, spin kick, rolling savate, and son, differentiated by the height of the kick or the method of kicking.

Among the pushing kicks, there is the leg trip that aims at taking the opponent down (making him fall) to bring him to grappling range, the stopping [kick] that aims to check the opponent’s advance.

The high kick aims to hit the opponent’s head. Its kicking method is not a kick that cuts into the flesh. Instead one must keep in mind that here one kicks with a pulling force once stopping the motion with the sense that you are hitting a certain point in a barrier with your knee. Even if you hit the opponent slightly, you need pull with force.

Compared to the high kick, the middle kick’s characteristic is in imagining the barrier as you deeply bring your to the inside. What you need to take note is that, whether it’s the high kick, middle kick, or low kick, the point is not simply to swing only the leg but to swing the kick through the rotation of the waist and hips.

The low kick is a kick that aims at the vital spot in the opponent’s thigh. Like the high kick and middle kick, don’t forget to forcefully pull the leg once you hit him.

The leg trip is a kick that aims at the part below the knee to take the opponent down. Hence it is more like a push or sweep or hook than a kick per se.

The low kick and the leg trip appear similar since the kicking height is the same, but they are essentially different kinds of kicks.

Basically, the low kick hits its target by pulling the knee after hitting the barrier/wall, so even if you miss, the body will not rotate 360 degrees. But with the leg trip, since it uses the technique of round kicks but without the “barrier,” when you miss, the body ends up rotating. Hence when missing with a leg trip, you can easily be victimized by the opponent’s strikes. So you need to quickly rearrange your posture to prepare for the next attack.

What is the corkscrew kick?:

The first thing to keep in mind is that the corkscrew kick, that is unique to shooting, is the foundation for impact-giving kicks that aim for the one shot KO.

By “corkscrew” we mean the tool that is used to open by turning the cork of a wine bottle.

The corkscrew kick deeply enters [the inside of the opponent] by drawing an arc over the shortest distance as if opening a fold-up fan.

On the other hand the round[house] kick, is a kick that draws a big arc from the outside to the inside. Therefore it is haunted by the danger that the opponent can enter by tackling from the front. But the corkscrew kick, because it draws the arc within the scope of a person’s width, makes it difficult for the opponent to come in from the front.

In other words, the initial movement of the high kick, middle kick, and low kick, are the same as the knee kick. Hence, when the opponent tries to enter with a tackle, the knee kick will hit him in a counter.

Therefore, because the corkscrew kick pushes through in a linear line through the shortest distance to the opponent from the front, not only does it prevent the opponent from entering into one’s inside, it becomes a kick possessing a menacing speed and destructive power.

The necessity of the knee turn:

In order to master the corkscrew kick, begin by training the knee turn.

If we allow an average person to kick as he likes, without teaching him anything, he probably will try hard to kick only with his leg, probably imaging the roundhouse kick.

We can say that the knee turn is a training that modifies that roundhouse kick into a corkscrew kick.

By training in this repeatedly, the kick that until then was hitting its target by circling from the outside, gradually will come to hit its target from the front.

4c7120008278af8362c53c6f443507a2b4985e1e.jpeg


Previous Page Translated

The point in practicing this is to tighten your groin while thrusting your head forward, thrust forward your knee while standing on your toes, and at once to swing your foot up over 45 degrees as if springing forward with the swinging of your waist/hips. The heel of the foot you are swinging up should naturally turn upwards. The heel turned upwards is proof that the waist/hips are firmly turned.

In terms of the body’s structure, the knee turn requires a flexible waist/hips.

One could say that a proper knee turn is born of the movement of a flexible waist/hips as in a hula dance.

In order to master the proper figure of the corkscrew kick and to avoid bad habits in kicking, it is necessary to practice the knee turn, learning it with the body.

Now I want you to realize that the knee turn is a fundamental practice immediately prior to your kick hitting the opponent from the front.

Practicing the corkscrew turn:

Once you can perfectly do the knee turn, you would next start practicing the corkscrew turn.

The corkscrew turn is the state of pulling the foot from the inside to the outside while reversing it after the point of the knee’s lower outer side hit the barrier.

The point in practicing this is to thrust forward the knee while tightening the groin, not by bending the upper body, but by thrusting the head firmly forward, keeping your mind focused on the front while rotating you waist/hips.

Right before impact the ankle will be completely turned inward. Because this will make the muscles of the external side hit the target, after the knee hits the barrier when transitioning to the pulling movement, stretch the leg out with the force of twisting it outward from being turned inward.

Flexibility created through stretching:

Even if you understood in theory what we have been talking about, if you attempt to execute the corkscrew kick without any flexibility of the abdomen or flexibility of the neck, you will fail.

9cf27be968b81b1d57af11fd00e190ca7db31eb7.jpeg

d9efbc3331b976c3861f2ff25aaa7254c7b92f2d.jpeg


Previous Pages Translated

Exercise 3: Building the Foundation for the Corkscrew Kick:

I. Stretching:

The stretching we explain here aims at fundamentally changing one’s idea of the length of one’s leg, and to build a flexible waist/hips for kicking with the waist/hips.

It trains you to build a strong kick that utilizes your whole body and not just the tip of your foot.

Key to practice:

1. Breathing is important in stretching:

Deeply breaths in and then bend your body while slowly breathing out. As you get used to this you learn how to breathe naturally for stretching.

2. Employ the length of your leg:

Use the entire length of your leg without bending it at the joints, while intending instead to bend from the upper part of your flank/side.

Stretching 1:

With your receiving partner stooping down (photo 1), place the Achilles’ tendon of your right foot on his left shoulder. The toes of your pivoting foot (left foot) should be at a right angle in relation to your body. The recipient straightens your knee with his right hand (photo 2).

Deeply breathe in and then while slowly breathing out, bend your hip joints as if they were your stomach pit from the position in photo 4. Place your forehead on your right knee (photo 3).

b611b77980ce85cd7488774e54d804dc435062ae.png


Key to practice:

1. Swing up with balance:

One tends to break one’s balance when kicking high, but try swinging your let as high as possible without bending the knee.

2. Think of your stomach pit as the beginning of your leg:

Kick by thinking that from the tip of your foot to your stomach pit is one [straight] stick. Kick as high as possible, thinking of your stomach pit as your groin.

Key to practice:

1. Do not bend the knee:

You can use recoil, but you must never bend your knee. Kick with the intention raising it to the back while keeping your knee straight.

2. Turn your waist completely so it faces the back:

Even if the upper body remains as it is, you must turn your waist 180 degrees to the back. For this the foot must be raised high.

3. You can also do this alone:

You can train in this way even alone if you use a handrail or a chair. Unless you do this every day, more than 30 times alternating left and right, there will be no effect.

Stretching 2:

Practice kicking high while maintaining your balance and without bending you’re your knee (photo 1). Do this more than 30 times left and right, thinking of the area from your stomach pit to the tip of your foot as a single stick and with the intention of bending from this part (photo 2).

87c4699214793245a02c3a5efca911f2189eb57a.png


Stretching 3:

Grasp your partner’s hands from above and practice stretching with side raises (photo 1). This stretching exercise is to acquire flexibility of the hips/waist after swinging your leg upwards.

67d2d94fee3d84d93778a97c0acb81322cba47fe.png
 
Volume 30 Continued...

I. Knee turns:

The knee turn is an exercise that serves as a foundation for the corkscrew kick. Starting with the knee, rotate your hips/waist and swing your foot upward. If you stop your knee at that point and turn it, you have completed the corkscrew kick.

Securely master the proper form and balance for the kick.

Practice the turning of the left knee with the switch (photo 1)

72a84bbb37bf19b66d5c11919866bb24e0ebd50a.png


Think of the area from your stomach pit to the tip of your foot as a single stick; you must absolutely not bend your waist to the front (photo 2). The state of thrusting forth the knee from the waist/hips without bending the upper body (photo 3). Swing the leg/foot up while rotating the waist and without breaking the orbit (photo 4).

Enter the orbiting path from the inside in a straight line (photo 5).

ae3e0d246fcf765bbdb32d6170d5ad779a07ce7a.jpeg


Key to practice:

1. Keep your head in a uniform angle:

It is necessary to draw in your chin, keep your forehead facing the front, and stabilize the angle of your head, in order to also to prevent your upper body from bending to the back. If the upper body is bent, the balance of the center of gravity retreats and the power of the kick is reduced.

2. Swing the knee up by wringing/squeezing it:

To prevent it from becoming a roundhouse kick, swing the knee up in a linear line. It works well when you do this if you swing it up with the intent of scissoring/squeezing the groin with your legs.

Counter Measures to deal with the Southpaw:

Southpaws (left-handed people) are rare among Japanese people. For this reason, one if often surprised and puzzled when fighting a southpaw. To prevent this as much as possible, it would be good to routinely include in your practice scenarios of fighting against a southpaw. And if you are a southpaw, it is necessary to know how a fighter in the orthodox (right handed) stance would fight against a southpaw.

(Kicks)

In the orthodox stance, the left foot is positioned in the front and the right foot which is the dominant foot is positioned in the back. By contrast in the southpaw stance, thee right foot is in the front and the dominant left foot is in the back.

Thus for your kick to hit the opponent’s face, it is possible to hit the opponent with a powerful kick with the dominant leg without switching feet.

When throwing a leg trip (leg sweep), switching is required. With the orthodox vs southpaw stances, even if one throws a leg trip, it becomes a sweep facing the front side. Because the leg trip is effective when sweeping from the back side instead of the front side, against a southpaw you should first slide out to the left and throw it.

And in cases where the southpaw is attacking an orthodox fighter, slide out to the right.

In regard to kicks, when dealing with a southpaw, we need to take into consideration the necessity of the switch.

If we compare kicks with and without switching feet, the power is about the same. However, in the cases where we switch the feet, there is the advantage of making it difficult for the opponent to foresee from which foot the kick will come.

The strategy of breaking the opponent’s timing with feints through continuous switching and sliding is an effective strategy against both orthodox and southpaw fighters.

(Punches)

The conditions for punching are about the same but defense is slightly altered.

For example, when defending against the opponent’s jab by parring it, in cases where both are on the orthodox stance, you would par with the right hand. On the other hand, when parring in the orthodox stance a jab thrown by an opponent in the southpaw stance, you would par it with the left hand. If you make a mistake in this procedure, your guard will open up and you can receive a counter.

(Tackles)

Notice the foot for pushing off that leads to a tackle. Remember that an orthodox fighter pushes off with his right foot and a southpaw fighter pushes off with his left foot, and detect the timing of his pushing-off, so that you can attempt a counter.

(Strategies unique to shooting)

In shooting, it is best to be able to fight from left-handed and right-handed stances equally. Hence, if you are able to attack and defend in both stances freely, and keep in mind the points of both orthodox and southpaw attacks, to skillfully evade them, there is no need to particularly devise a counter measure against southpaw fighters.

To Be Continued…
b8562fae10540e7eff69f28eac0dc5ceb8e173f3.jpeg
 

0506×807 103 KB


Kayfabe. A word that just about any pro wrestling fan of today knows, but that was a very different story in 1985.

Imagine being a superstar on the level of Hulk Hogan in your country, just to walk away from it all at the peak of your popularity/drawing powers just because something bigger weighed on your heart.

Well, that was the story of Satoru Sayama in 1985 as he walked away from pro wrestling in disgust, throwing the cash machine that was the Tiger Mask gimmick away so that he could spread the word about shooting (MMA) to the masses. MMA (shooting, or later Shooto as it would come to be known), was always on Sayama’s heart, and his 1985 autobiography was his manifesto to the world that the realms of real mixed fighting were nobler than the illusion of scripted storytelling.

If you’re anything like me, you have wondered what secrets lurk in this famous autobiography, but couldn’t find out due to an inability to speak Japanese. Well, that is no longer an issue because we at KAKUTOGI ROAD are proud to begin the first-ever known attempt to have this classic professionally translated. Yes, for over a year, we have been offering professional translations of lost classics in addition to the many painstakingly researched columns we offer on mma/puro/kickboxing history. This book serves as a flashpoint of not only the history of MMA in Japan, which would later go on to affect all combat sports for decades to come, but is a fascinating look at wrestling history before it was trendy to speak freely of it being a work.

Come join us over at www.patreon.com/KakutogiRoad as we begin this journey into the great mysteries of the recent past.

Also, when you join, thousands of hours of mma/kickboxing/puroresu/lucha/training instructionals/combat-sports footage, detailed historical reviews/analysis, interviews, and translations await you!

For only $10 you get to Follow along with MMA from the beginning (in this case March of 1991) Gain access to the Kakutogi Video Archive, which currently has several thousand hours of combat-sports footage, and more are being added constantly.

We also cover a lot of kickboxing history along the way, and of course, add footage of those events whenever possible.

We include a lot of contemporaneous media/news sources to coincide with our columns, so you can follow along with the media coverage of that era, also.

We continue to provide translations of rare MMA/wrestling materials into English. We have exclusive interviews with figures that were there, and one of the major goals of this project is to interview many of the Japanese/Dutch/Brazilian personalities that were important to the development of MMA, many of which, have been ignored by western media.

You also get a warm fuzzy feeling, knowing that you are helping MMA/wrestling history to be adequately covered by people that actually care about it.
 
This might just be the greatest thread in Sherdog history. Amazing.

Thanks!

And at the risk of sounding like a shill, I must say to everyone that there is much, much more over at www.patreon.com/KakutogiRoad Not only are there many more chapters of this book, but we've started translating Sayama's autobiography, as well as many of our regular columns that aren't available online. I don't think anyone would be disappointed if they checked it out.
 
test.png

Don't get caught acting in an unbecoming or irredeemable manner! Head on over to www.patreon.com/KakutogiRoad, where you can not only finish this great series of Shooto history, but you can also jump on the many ongoing translations of Sayama's autobiography: Kayfabe. That was his manifesto for the importance of starting his new sport of shooting (MMA) and is well worth anyone's time that is a fan of MMA history.
 
Back
Top